Lovely sunbeam

Lovely sunbeam
Lovely Sunbeam (and Annierose) 88-99-PF

Friday 30 December 2016

Heater plumbed in, radiator halfway there.

The New heater element was fitted a while ago, now it is plumbed in to the Cologne ready for water.
The heater valve is fitted under the alternator and is also used to change the hose diameter from 19mm out of the thermostat housing to 15mm used in the rest of the circuit.

Heater fan needs to be wired into circuit.

Radiator fitted - top hose is the standard Granada item shortened a little.

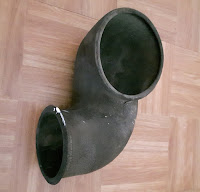
Bottom hose is from a standard Capri.
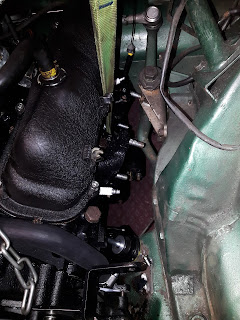
The thermostat housing outlet points forward and the radiator inlet (outlet?) is also pointing forwards inline.
The Capri hose is reversed and the last bend is cut and rotated 90 degrees. It seems to work.


Except I have a big leak out of the thermostat area.
It all has to come off again.


And the brake pipe needs to be secured.


Radiator alternator and thermostat all removed, extra clip added to brake pipe.
Seems the leak was most likely just a not tight enough hose clip. but the thermostat needed fitting correctly anyway. Thermostat first then rubber ring.


Thursday 22 December 2016

positive to negative earth conversion

The engine and gearbox is bolted in its final place.


To attempt to start it I needed to convert to negative earth for the starter motor and alternator.
Just turning the battery 180 degrees was almost all that was required. (and changing the battery connnectors).
This page about positive to negative conversion gives more details and ideas on how to connect an alternator  via the regulator box.


When The wiring is finished I will connect the Alternator output direct to the starter motor positive feed which is direct from the battery. I moved the main starter feed at the old solenoid so the original output was now combined with the battery feed. The solenoid output then is only a small wire to feed the V6 starter solenoid.


The Huco sucking fuel pump was fitted in the engine bay and connected to 12v.

The Capri wiring loom loosely placed in situ and the engine was test started.
It was pleasantly loud with no exhaust and proved the circuits are all correct.

The clutch pedal was tried and seems to not be working. The lever moves about 10mm. Will need to adjust and test again.

Later I realised the clock wasn't working and the extra electric fan was spinning the wrong way.
The clock had been modified by a previous owner so the wires were swapped and its all ok now.
The fan will have the wires swapped also later.

Next plan... fit radiator and fill with water.. check clutch

Merry Christmas

Post Christmas update - Capri wiring loom now modified and connected through the bulkhead. The Duraspark unit is in the Passenger foot-well along with a new 4 way fuse unit. This fuse unit currently supplies 12v to the ignition and the tacho. Later it may supply power to any other new ancillaries...like a Radio or the heater fan.
Clutch checked further - still can't release.


Monday 12 December 2016

Engine and Gearbox in final position


The engine mounts were welded in place.
In fact I welded the left one, fitted the engine again and then tacked the right one in place to be sure before removing the engine and finishing the weld.

I decided to use the Jose gearbox mount rather than the auto box mount.


I used a Sierra type 9 small vibration mount and modified the Jose mounting to fit.
The Jose mounting was in the right place - just needed a different set of holes.


The modified gear lever is set a bit further forward now.
But as I cant select 1st or 2nd gear I may have to take it all out again!


Also replaced and re routed the front brake pipes.


And installed the Clutch master cylinder and clevis in the final position.

Tuesday 29 November 2016

type 9 gearbox "shortening"


The engine and gearbox was removed again in preparation for the engine mounts being welded in place. I forgot to remove the gearlever..!


A few measurement were taken, The main measurement for the shortening is 11" from front of tail housing to the front of gear lever casting.


With the gearbox removed from the engine the tail housing was removed.
Beware the layshaft can stick to the housing and pull out with it.. potentially leaving all the cogs and gears rattling around the bottom of the case.. I think I saved it in time.


Now the tail housing is in the ultrasonic cleaner. ready for the hacksaw..!

Sunday 27 November 2016

Tacho conversion from Mechanical to Electronic


Converting the mechanical Tacho to electronic.
And swapping the bezel so it looks the same as it was.


I used an RVI guage from another machine and added the Spiyda converter.
Set it up for a 6 cyl system using the audio files.

Later I used a signal generator at the office to test the gauge on the main circuit. I added a switch to swap the input lines between the two options the electronic system operates on.

Will it work? When tested later on the car it seemed to be OK but the needle settled at 500 rpm when all powered off.
This was due to the mechanical pointer being balanced so the needle is effectively "weightless" and wont assist the return to zero.

I ground down the tiny brass counter-balance weight and now it falls to zero correctly and still works on the bench and in the car .


Trial fit of propshaft with new type 9 adapter and new bearings all-round.

With everything in the right place - it now looks like I will need to add 1" to the propshaft length for a final solution.

Sunday 6 November 2016

Engine swap -finalising position.


The old gearbox was an Borg Warner 35 automatic, The original was a standard manual with overdrive so I had both sets of gearbox mounts to potentially use.

Remarkably the Auto box mount fitted just right and only needs the addition of a M12 hole and a small reinforcement.


The gear lever protrudes directly through the ashtray! But it does feel as if its in the right place when sat in the seat.

The plan was to shorten the linkage as per this series of photos.


This being a Right hand drive Alpine and a cologne two port head - the passenger side rear outlet is very close to the steering linkage. The exhaust stud was fowling on the grease nipple.

Some adjustments have been made to the position and it will be possible to fit a bespoke set of headers in there now.

But the linkage will need protection from heat.


Checking the Radiator alignment.

Top hose port is good and will use a standard Granada hose (shortened)

The bottom hose outlet needs to be readjusted.

Thursday 3 November 2016

Engine swap (part two)


Busy few days.

The engine mounts were cut out.
Nice to see some of the original colour. It will return to that colour one day.
Steering bar replaced. Awkward to fit.
 Trial hanging of the engine.

Will the engine go in with gearbox as well?

Annie wont be impressed with the state of the carpet!

Lots of things get in the way.
A few extra dents and chipped paint.

The oil filter was still on in this pic.. it gets in the way.
The remote filter will be fitted shortly.


Ready for takeoff captain...

Its not in the right place yet but it doesn't look so big now it's in.

I need to cut the transmission tunnel at the gear lever end to be able to push the engine back further.

Then the mounting position can be finalised.

And then pull out the engine again.. :-(

Thursday 27 October 2016

Engine removal - the change begins.


Engine swap part 1 (of many)


Sad to decommission the sunbeam but it's time to remove the old engine.

Deadline to have it all on the road again is June 2017.
But hopefully earlier.

We are going to the Laon Classic June 3rd in France.

No pressure yet.. (But many overseas jobs on the horizon)


It took all after noon to get the engine out.
Maybe not the best idea to leave the gearbox behind.
But the auto box looks big and heavy.

Not very much space in the engine bay to get at most of the bolts. And of course I forgot one so the engine would only move so far before it got stuck.

Had to take the water pump off as well to move it forward enough.


BW Auto gearbox next to come out.


Engine bay doesn't look to be big enough!

Sunday 23 October 2016

Adding a heater to the Alpine

Its still sunny so I'm reluctant to take the Sunbeam off the road and remove the engine at the moment so I thought I would trial fit the heater and fan.

It's quite hard to believe that a UK spec car didn't have a heater fitted as standard.

This rubber tube was fitted in lieu of the fan.


It took me some time to realise where the heater should go and how to access it.

Underneath the bonnet catch.
I've now fitted the heater element.


With all the wires and mods under the dash over the years it was a bit awkward to squeeze in the fan unit complete.

I had to disassemble the bracket and remove the motor from the snail housing and fit each item in turn.


I should have cleaned up the bracket first.
This was supposed to be a temporary trial fit but it might stay.. except I now need to source or make the last bit of hose to join the fan to the ducting.

And connect the electrics.

And the hoses to the screen demisters


And a nice time to test the engine again... yayyy it still runs...


Sunday 18 September 2016

Type 9 Hydraulic Clutch conversion

The plan was to follow the US design and use a Wilwood pull slave cylinder.
But, the type 9 gearbox has the clutch lever on the opposite side so the Wilwood pull cylinder gets in the way of the offset oil filter.

It wouldn't be a problem if the oil cooler (oil/water heat exchanger) wasn't leaking. So, unless I replace it or try a remote oil cooler sandwich plate I need a backup plan.

I had a search on the web and found a few tried and tested solutions. pistonheads was the version I decided to copy. It seems its also used on the TVRs .


 A design was made in cardboard and then drawn in CAD for the laser cutting.

A landrover slave was "found" in the garage.
The bore may be too big.
The template was bashed into shape.

A few flaws in the design meant a little cutting and adjustment was required at the pointy end.


It looks like it might work..  I haven't welded the seams yet.

Also it may get in the way of the sunbeam body.

Next time I have a few spare days I'll finish it off and test it with the master cylinder.

Note the Capri headers. Rusty and sawn off. These are available off the shelf - but look like they will definitely be in the way.


Update

 The slave cylinder works ok but the combination with Wilwood master and landrover slave doesn't match well. So I fitted a landrover master as well.
A few shims were made to be able to adjust the master position and still be able to adjust the clevis.


The clevis itself was hard to find


Sunday 28 August 2016

Starting the V6 - attempt number two

Having seen a rather large flame jump out of the carburetor I suspect I may have the timing a bit off.
The timing light showed I was about 180 degrees off. Easily fixed except the engine stopped sparking after that.

Lack of spark was traced to the coil negative lead wire. The old Ford Capri wiring loom had given up. Judging by the state of the copper inside it might be worth a proper rewire in the end.

Once sparking again the timing was adjusted and a squirt of "Easy Start" applied. It seemed to work!
I wired up the Huco suction fuel pump with a separate switch and switched it on.
I have installed a fuel return hose and there is a small constant dribble out of the return hose. Hopefully this will help prevent the summer embarrassment of a vapour lock in the fuel filter which "lovely sunbeam" suffers from these sunny days.

With fuel in the carb and a dash of "easy start" - away she went... Hurrah...


Best I hurry up and fit the Radiator!

Saturday 27 August 2016

Starting the V6 - attempt number one.


A selection of fan-belts were ordered and the size chosen was SPA1120.
It clears the thermostat housing on the inner pulley and allows the alternator to sit just out of the way of the rocker cover so it might be removable. I've ordered another belt for the outer pulley... will they match?

Still deciding how best to modify the Thermostat housing.


Engine and gearbox filled with oil,
Pressure gauge jury rigged.
Oil pump primed with the electric drill and long socket.
Coil, fuel pump and Duraspark unit bolted to plank on top of gearbox. Dead gash...

Starter motor runs OK with spark plugs out.
With plugs in - the jump leads burnt out very quick so proper battery leads were sourced.

I seem to have a spark some of the time.but it looks like I'm 180 degrees out.

Maybe it'll start tomorrow,

Tuesday 23 August 2016

Engine meets gearbox and trial fit to subframe

 It was very hard to remove all the suspension parts from the subframe. A lot of WD40 and  time. Also a realisation some nuts were captive hence wouldnt turn anyway.

An option is to rebuild this subframe and fit the whole unit.

For the moment I will use it as a test bench.


The original engine mounts were removed. My old 4" grinder didn't quite have the reach once the discs were worn a little.


 The engine was removed from the stand and the flywheel and clutch was fitted.

Alignment of the clutch plate and gearbox was difficult at first as the clutch plate seemed not to fit the gearbox shaft.

But with the gearbox balanced on the hoist alignment became easier.


With the engine and gearbox angled for a horizontal carburetor platform the fan and crank pulley just miss the subframe.

The fan can be set back another 5mm giving more forward adjustment of the engine if necessary. The current engine mount is approximate and final position will be determined in the car.


Also the thermostat housing outlet needs to be modified to point forwards to clear the subframe.
http://v6alpine.blogspot.co.uk/p/v6-joses-conversion-kit-kit-components.html
And it looks like I will need to modify the modified radiator. The bottom hose coupling looks to be a bit too low.


Monday 22 August 2016

Capel Classic car and bike show


No proper work done for a while (busy)

But got back home in time for the local show.


It rained quite hard on the way there but the day cleared up nicely and there was good turn out.


The way the windows misted up in the rain is probably a good hint to install the heater and fan that have been in the cupboard for a while.


Friday 15 July 2016

Le Mans classic 2016


Lovely Sunbeam managed to make it to Le Mans and back in one piece.
The engine is starting to sound a bit noisey so the V6 may be required soon!.

Friday 24 June 2016

minor tasks, brake pads and carb

The Sunbeam can pull to the left when braking.
I checked the pads and they were quite thin so bought some new ones and fitted them.

The RH inboard pad was the least worn and it seemed the piston may have been stuck.

A test drive showed not much improvement.
Will need to look into the brake caliper status before the engine goes in.

Test fitted the Weber 38DGMS carb and 9" filter.

Sunday 29 May 2016

Subframe mods and alloys


I bought a subrame - complete with everything except the steering box and wheels.

VERY rusty but the subframe itself looks in better condition than mine.

Also all the parts fitted are the maintenance free type from series 4 onwards.

I might refurbish this one complete to install on the series 3 with all new bushes and springs.

The upper wishbones are proving difficult to release!

The original engine mounts need to be cut off and the new engine mounts welded in place only once the engine has been test fitted in situ.


The lovely sunbeam came with a set of alloy wheels.
I don't like the look of them but having realised that some vibration I was experiencing at 60-70 mph was caused by a flat spot on a rear tyre, I fitted them to test.

The handling has been transformed. Straight line is more stable, steering is much lighter. Wish I'd done it before. I would prefer a set of minilites. So will get some for next year.

Wednesday 25 May 2016

Radiator mod


Before


After


Home again and the spare radiator has been delivered from Hereford Radiators.

It has been up-rated to 3 row core and the inlet and outlet ports have been swapped over for the cologne V6.


November 2017

Recently had the thermostat cover modified.
This now puts the water a bit too close to the radiator.

So I've started to modify the radiator again


Rotated the bottom hose 180 degrees and angled back a bit.

Now a Ford Capri bottom hose will fit with a few mods.