Lovely sunbeam

Lovely sunbeam
Lovely Sunbeam (and Annierose) 88-99-PF
Showing posts with label type 9. Show all posts

Sunday, 15 August 2021

Type 9 Gearbox repair and Long first upgrade. SAOC National 2021


At the end of last year the 5th gear stopped working.
- it was as if in neutral.

Initially it turned out to be a simple fix - a broken circlip.


In trying to stop the gearbox leaking I made a small error as described in the type 9 gearbox manual.
Which meant a few rollers escaped on the layshaft.
Which I didnt notice - so a run around the block was sufficient to hear a new whine and then the need to remove the gearbox again.


The gearbox was despatched to Paul at First Motion  for proper repair.


I also chose to go for a "long first" conversion.


I chose the "longest" first gear option of FM275 which kept the other ratios the same.

Once on the road the first gear useage is perfect.
Before - it felt as though as soon as the car was moving it was time to choose second.

Maybe I dont need the Scimitar axle now.

A long run to the SAOC National at Thruxton proved it was better than before. Even fifth was easy to select now 😍


Sunday, 11 February 2018

Propshaft

The original propshaft from the BW35 auto was modified by changing the output sleeve yoke to a type 9 version.

It was considered at the same time to lengthen the propshaft by 1" - but the company I used ( autoprop-uk ) had recently had some items lost in a fire and couldn't do the balancing. So we just changed then ends and spiders.

I decided to wait a while to determine if all was well before going to adjust the propshaft length.


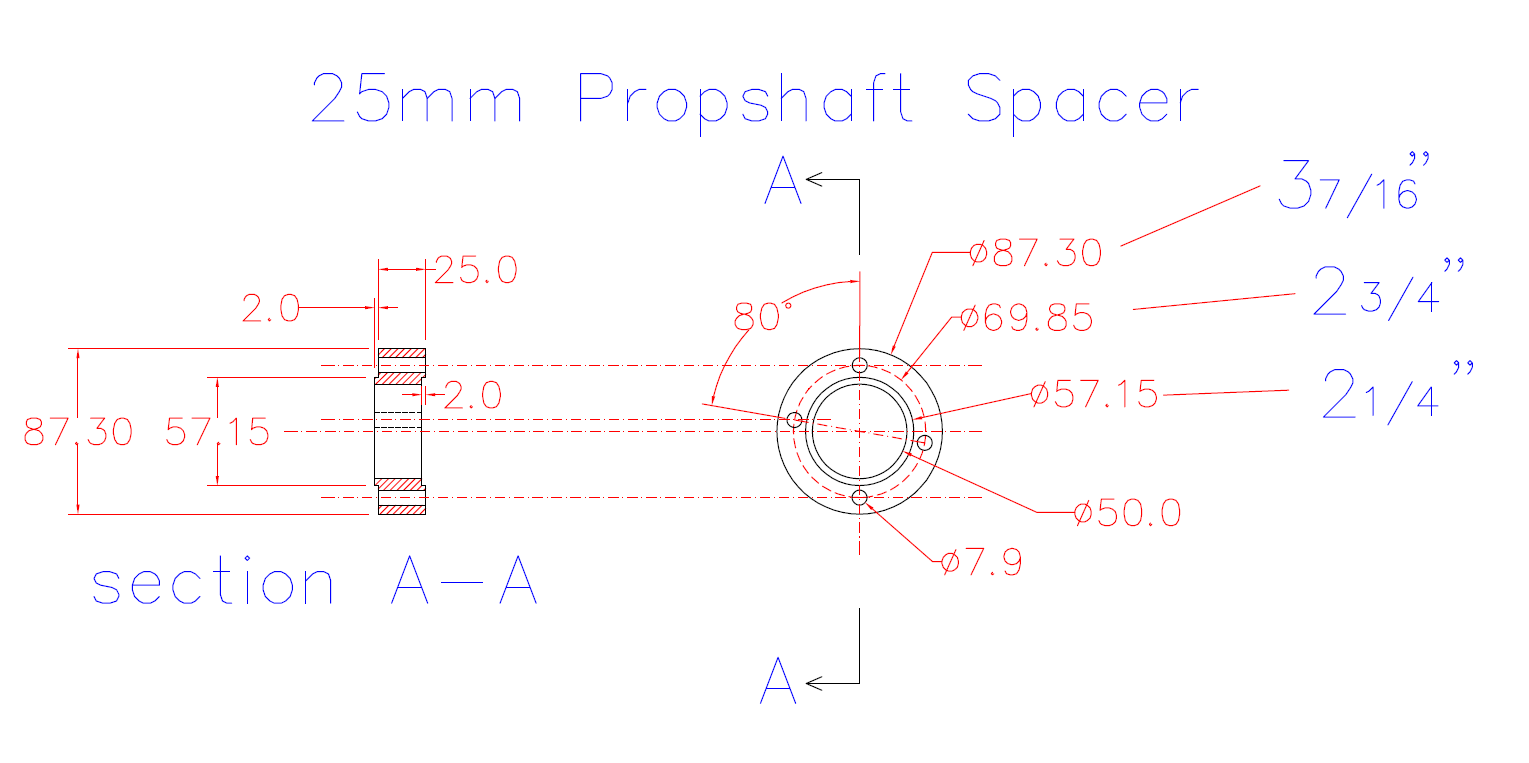
It later occurred to me that a spacer on the axle would be a solution. I wasn't sure if it would be "safe" until I noted a few "propshaft spacers" for land rovers and Atlas axles available on eBay.


So here is the drawing for the Sunbeam.

Lofty volunteered to make it.


A week later and here it is - and it fits! (amazed my measurements were accurate but lofty made compensations for my lack of tolerances )
Perfect fit on the propshaft, slight interference fit on the Diff flange as I made the measurements the same for both sides. M8x50 class 8.8 were used as the 5/16" x 1-3/4" UNF grade S were just a little too short to fully fit the nylocs.
A test run proved it hasn't added any balance issues and I'm happier the propshaft fits further onto the gearbox.

Speedometer calibration

In March 2017 A Speedo cable was purchased for type-9 gearbox to Jaeger clock from Speedy cables .

The speedo is naturally out of calibration due to the gearbox change.
Speed in mph is roughly half indicated speed in kph.


Several options are available to adjust this.

  1. speedy cables can calibrate the existing speedo. from £80
  2. www.speedograph-richfield.com can also calibrate the speedo but they also make mini gearboxes. from £90 
  3. make my own gearbox with ratio 3/4. 


I feel keeping the instrument original is a good idea, so..
I started with option 3 and made a cumbersome belt driven gearbox, connecting the input and output to the cables was the tricky part.
Then noticed that the speedo graph also do a type 9 right angle drive changer but also incorporate ratio changes. So this would help fix two issues at once as the speedo cable aims directly at the exhaust pipe.
The original speedo cable will also fit the new gadget.


I've contacted  speedograph for details to ensure the ratio is correct.
Its possible the standard RGB1030-08A 1:1.33 NR ¾ x 26 / 3mm Square  will be just right  but nice to get it spot on.

Speedograph need the tyre size and number of turns per 6 wheel revs.
I measured the speedo cable rotation at the office car park as it has a gentle slope to aid pushing the 6 turns of the driven wheel. I measured 8-1/8 turns.
With tyre size 185/55/R15 this should have a radius of 72.3" and 877 revs per mile.

some Alpine speedos types
S/N 6117/01 - ??? - 1000 revs per mile
S/N 6117/02 - Up to B9105974 - 980 revs per mile
S/N 6117/11 - From B9105975 up to Series 3 - 1000 revs per mile
S/N 5324/18 - Series 3 o/d  - 1408 revs per mile 
S/N 5324/23 - Series 4

Anyway - it seems I need a 1:1.19 ratio mini gearbox


After a short wait I fitted the new box today - its not quite right as They recomended 1:1.19 and I thought I needed 1:1.33 - I think I was closer. Maybe my speedo isnt standard 😒

Oil leak is making a mess!

It turns out my speedo had already been modified for the Automatic box. 
So Speedograph Richfield modified my speedo and it is now reading correctly and doesn't need the gearbox. The speedo is indicating a few mph lower than the GPS which is probably a good thing 😁


The speedo failed on the way to Le Mans 😞 - turns out it was the cable that broke.


Wednesday, 17 May 2017

Log Book and new engine


19 May 17
I've been working away for a while, Back for a long weekend to go to Spa Classic.

The log book has returned from DVLA with a change in cubic capacity. A lot less hassle than I expected.

The engine has been collected from specialised engines and looks good.
Would have preferred to build it myself (without the mistake) but working abroad for a while.
I'll begin the install after the trip to Spa


______________________________________________________________________


23 May 17

After Spa - now fitted the engine...
It runs but whines a lot.

I thought maybe starter motor stuck on.


Apparently its the Aluminium timing gear and will reduce in volume as it wears in!

Hope so

Need to refit the cooling system and fill with water etc.. - When I'm home again.


Friday, 17 March 2017

type 9 gearstick adjustment and steering end stop


If you get the shortening of the housing slightly wrong then gear selection isn't easy!

not easy to see in the photo - but I had to push slightly down on the gear lever to select first and second - which leaves you open to the possibility of reverse at the wrong time.

The selector shaft gearstick connector needed to be rotated a small amount clockwise and be re-secured to fix the issue.


The steering arm on the drivers side would make contact with the oil cooler/filter housing.


After a while it was realised that the series 3 has an adjustable steering end-stop on the lower wish bone.
A tweak with the 9/16" socket and the steering was slightly restricted stopping the steering arm from making contact with the oil cooler.

Wednesday, 15 March 2017

First V6 road test


The engine started to sound a bit rough. Like some metal on metal grinding noises.

Then a small leak started from behind the fan on the water pump.

Not a good time to start getting stressed.

An endoscope was used to have a look around and inside.
Removed the oil filter to inspect the oil and see if any contaminants were inside.


All seemed ok, but the noises don't sound good or healthy.

 The timing was adjusted and it was decided a run to the office would be a kill or cure solution.

First and second gear is a bit hard to select, so needs adjustment. First gear is a bit redundant (too low a gear). But the drive was a revelation in comparison to the previous auto box. Excellent fun.

After a rest at the office I added some rad-weld and drove home. No more leaks. Not the best fix but it worked.

Hand brake cable was then lubricated and adjusted. It had always been an issue - binding on - the cable wouldn't push back.  I rotated the cable 180 degrees at the handbrake end - it's much better now so the handbrake can be used.

A Speedo cable was purchased for type-9 gearbox to Jaeger clock from Speedy cables  which was also fitted today.
Now need to go for another run to see how far off calibration the speedo is and then do the calibration routine.

Tuesday, 29 November 2016

type 9 gearbox "shortening"


The engine and gearbox was removed again in preparation for the engine mounts being welded in place. I forgot to remove the gearlever..!


A few measurement were taken, The main measurement for the shortening is 11" from front of tail housing to the front of gear lever casting.


With the gearbox removed from the engine the tail housing was removed.
Beware the layshaft can stick to the housing and pull out with it.. potentially leaving all the cogs and gears rattling around the bottom of the case.. I think I saved it in time.


Now the tail housing is in the ultrasonic cleaner. ready for the hacksaw..!

Sunday, 6 November 2016

Engine swap -finalising position.


The old gearbox was an Borg Warner 35 automatic, The original was a standard manual with overdrive so I had both sets of gearbox mounts to potentially use.

Remarkably the Auto box mount fitted just right and only needs the addition of a M12 hole and a small reinforcement.


The gear lever protrudes directly through the ashtray! But it does feel as if its in the right place when sat in the seat.

The plan was to shorten the linkage as per this series of photos.


This being a Right hand drive Alpine and a cologne two port head - the passenger side rear outlet is very close to the steering linkage. The exhaust stud was fowling on the grease nipple.

Some adjustments have been made to the position and it will be possible to fit a bespoke set of headers in there now.

But the linkage will need protection from heat.


Checking the Radiator alignment.

Top hose port is good and will use a standard Granada hose (shortened)

The bottom hose outlet needs to be readjusted.

Sunday, 18 September 2016

Type 9 Hydraulic Clutch conversion

The plan was to follow the US design and use a Wilwood pull slave cylinder.
But, the type 9 gearbox has the clutch lever on the opposite side so the Wilwood pull cylinder gets in the way of the offset oil filter.

It wouldn't be a problem if the oil cooler (oil/water heat exchanger) wasn't leaking. So, unless I replace it or try a remote oil cooler sandwich plate I need a backup plan.

I had a search on the web and found a few tried and tested solutions. pistonheads was the version I decided to copy. It seems its also used on the TVRs .


 A design was made in cardboard and then drawn in CAD for the laser cutting.

A landrover slave was "found" in the garage.
The bore may be too big.
The template was bashed into shape.

A few flaws in the design meant a little cutting and adjustment was required at the pointy end.


It looks like it might work..  I haven't welded the seams yet.

Also it may get in the way of the sunbeam body.

Next time I have a few spare days I'll finish it off and test it with the master cylinder.

Note the Capri headers. Rusty and sawn off. These are available off the shelf - but look like they will definitely be in the way.


Update

 The slave cylinder works ok but the combination with Wilwood master and landrover slave doesn't match well. So I fitted a landrover master as well.
A few shims were made to be able to adjust the master position and still be able to adjust the clevis.


The clevis itself was hard to find