Lovely sunbeam

Lovely sunbeam
Lovely Sunbeam (and Annierose) 88-99-PF

Tuesday, 7 January 2020

Front suspension, swivel pins and trunnion overhaul


Time for a refurb of the kingpins (swivel pins) and ball joints.
I suspect some wear in the swivel pin and everything looks old.
Also will replace dampers with Spax adjustables.
Wheel bearings also appear tired.

Removal of the hub and axle wasn't easy - mainly because each split pin was rusted in place and needed to be drilled out before the nuts could be removed.

The dampers were replaced by a 12mm bar acting as a spring compressor.
Scissor jack is not holding up the car.

The swivel pin looks to have been rusty in the past.

Swivel pin is badly worn

Trunnion bush is worn.
Lower eye bolt seems to be ok but will be replaced anyway

The O rings are a quite soft but still strong enough to stay in one piece. They don't seem to be available so new O rings will suffice for now.

Plan A
Just resulted in a bent extension bar

Plan B
Hi tensile bar and tool
About 10 tons and a bit of heat
popped out OK

Pressing in the trunnion pieces was fairly easy after freezing the bushes and heating the trunnion. Old eyebolt was used to push in the sleeve. The socket pushing in the bush hasn't distorted the bush.

The swivel pin wasn't so easy as the new pin didn't have a taper to assist start so it was much harder to align.
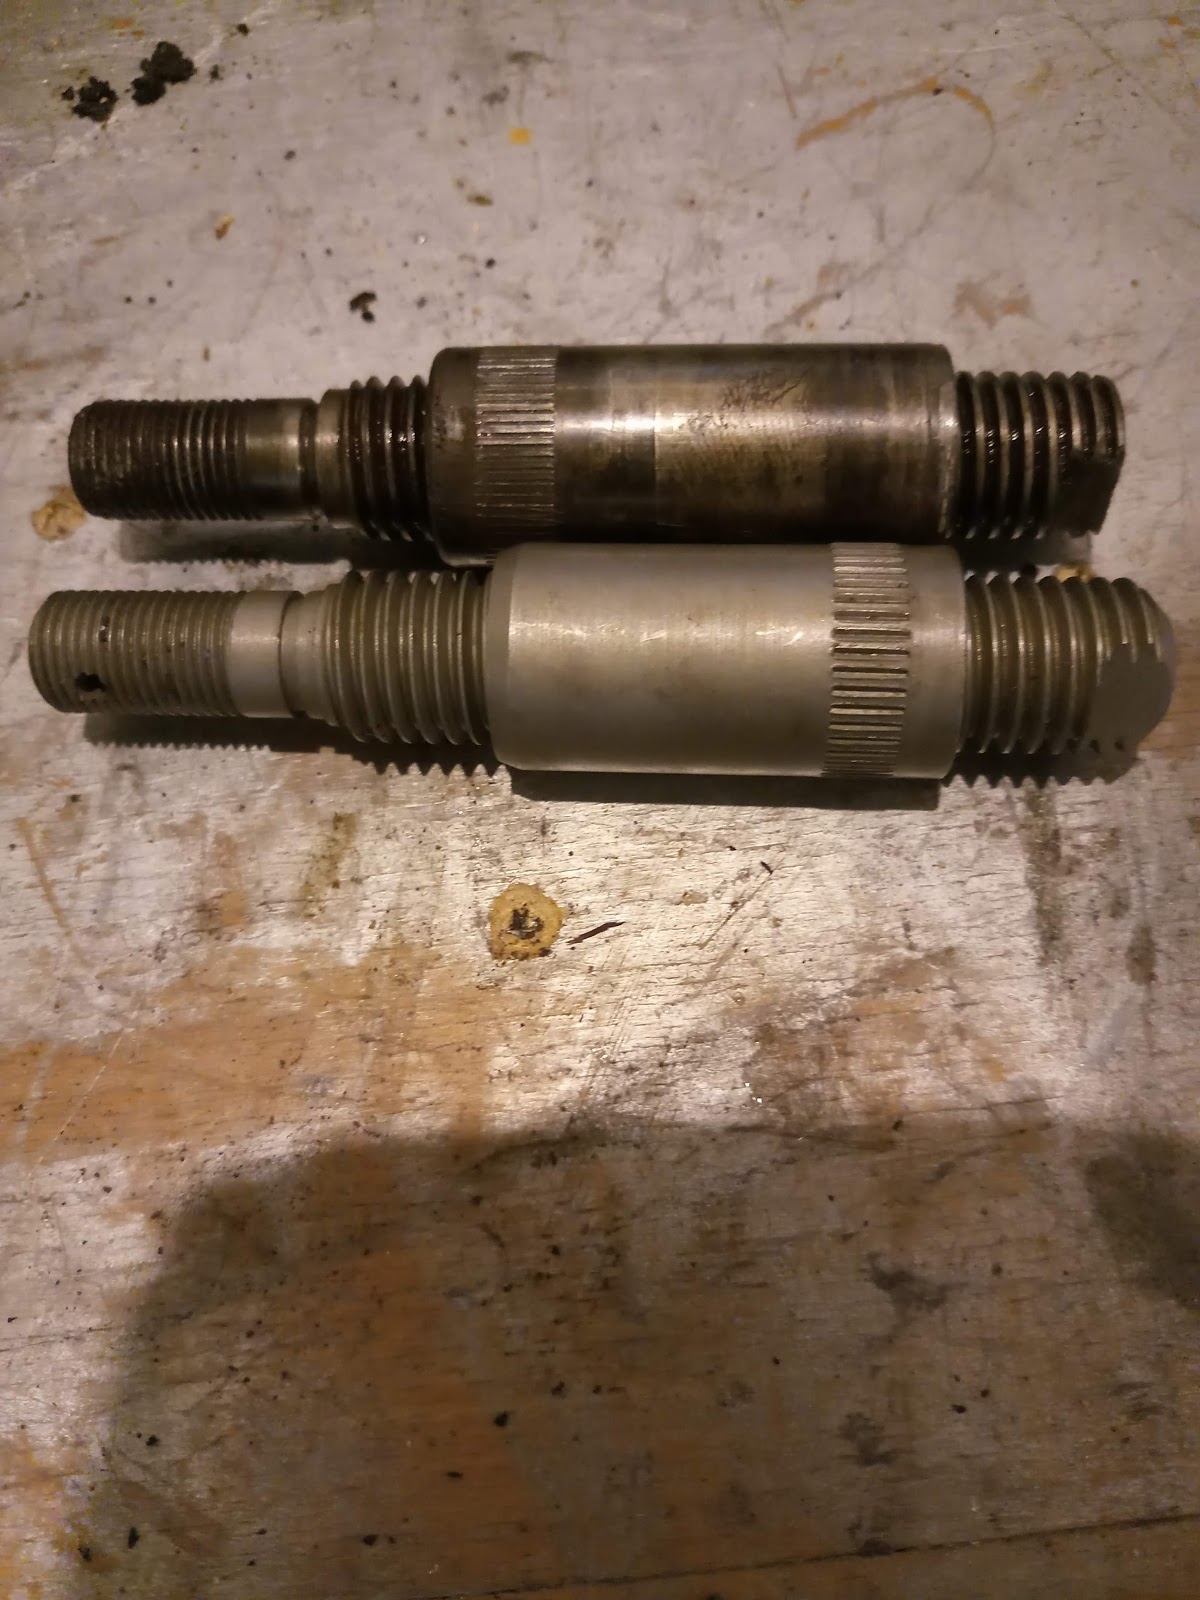


 Seems the new parts were slightly different.
So the short ones were eventually replaced with the correct long ones.


ss

x


o


i
Fitted adjustable dampers as well.


Sunday, 29 December 2019

Spa Classic 2019 and lost wheel


A trip to Spa classic went well along with a fun track lap session.

We went all the way there and almost got home without a mishap.
but a short way from home I felt a vibration starting so slowed down to investigate.


Slowly exiting the motorway I slightly applied the brake and suddenly the rear wheel flew past me into the bushes. Releasing the brake then allowed the drum to detach as well.

Fortunately all was at very slow speeds.


After investigation it seems this wheel hub had shorter studs than all the others!
Long studs are hard to find. and standard ones are definitely not suitable for alloy wheels.
Picture shows (left to right)
standard, "as-fitted", desired length, ebay sourced long stud.


A hub puller was obtained and as the studs are not able to be replaced without removing the hub.

The hub wasn't coming off easily. but eventually it released.
The new studs all fitted ok.

The other side refuses to come off so will need to be removed with halfshaft and taken to a press.


Sunday, 27 January 2019

Tonneau and windscreen


Christmas present to Sunbeam was a Tonneau from Don Hoods.
Winter probably isn't the best time to try to fit the tonneau as it wasn't easy to stretch so it was warmed up in the house every so often.


Nutserts


I used captive nuts (nutserts) and lift the dot fittings with M5 threads.


Tenax fasteners


For the front, once the screen was removed, I added Tenax fasteners to somewhere near the factory location.
This is instead of the air vent screws as is popular when the screen is still in place.

Some original paint exposed for view


The windscreen is badly scratched and is a nightmare driving at night or into the sun.

The rubbers were showing all of the 55 years.  Despite having been resprayed with screen removed the rubbers were still original.

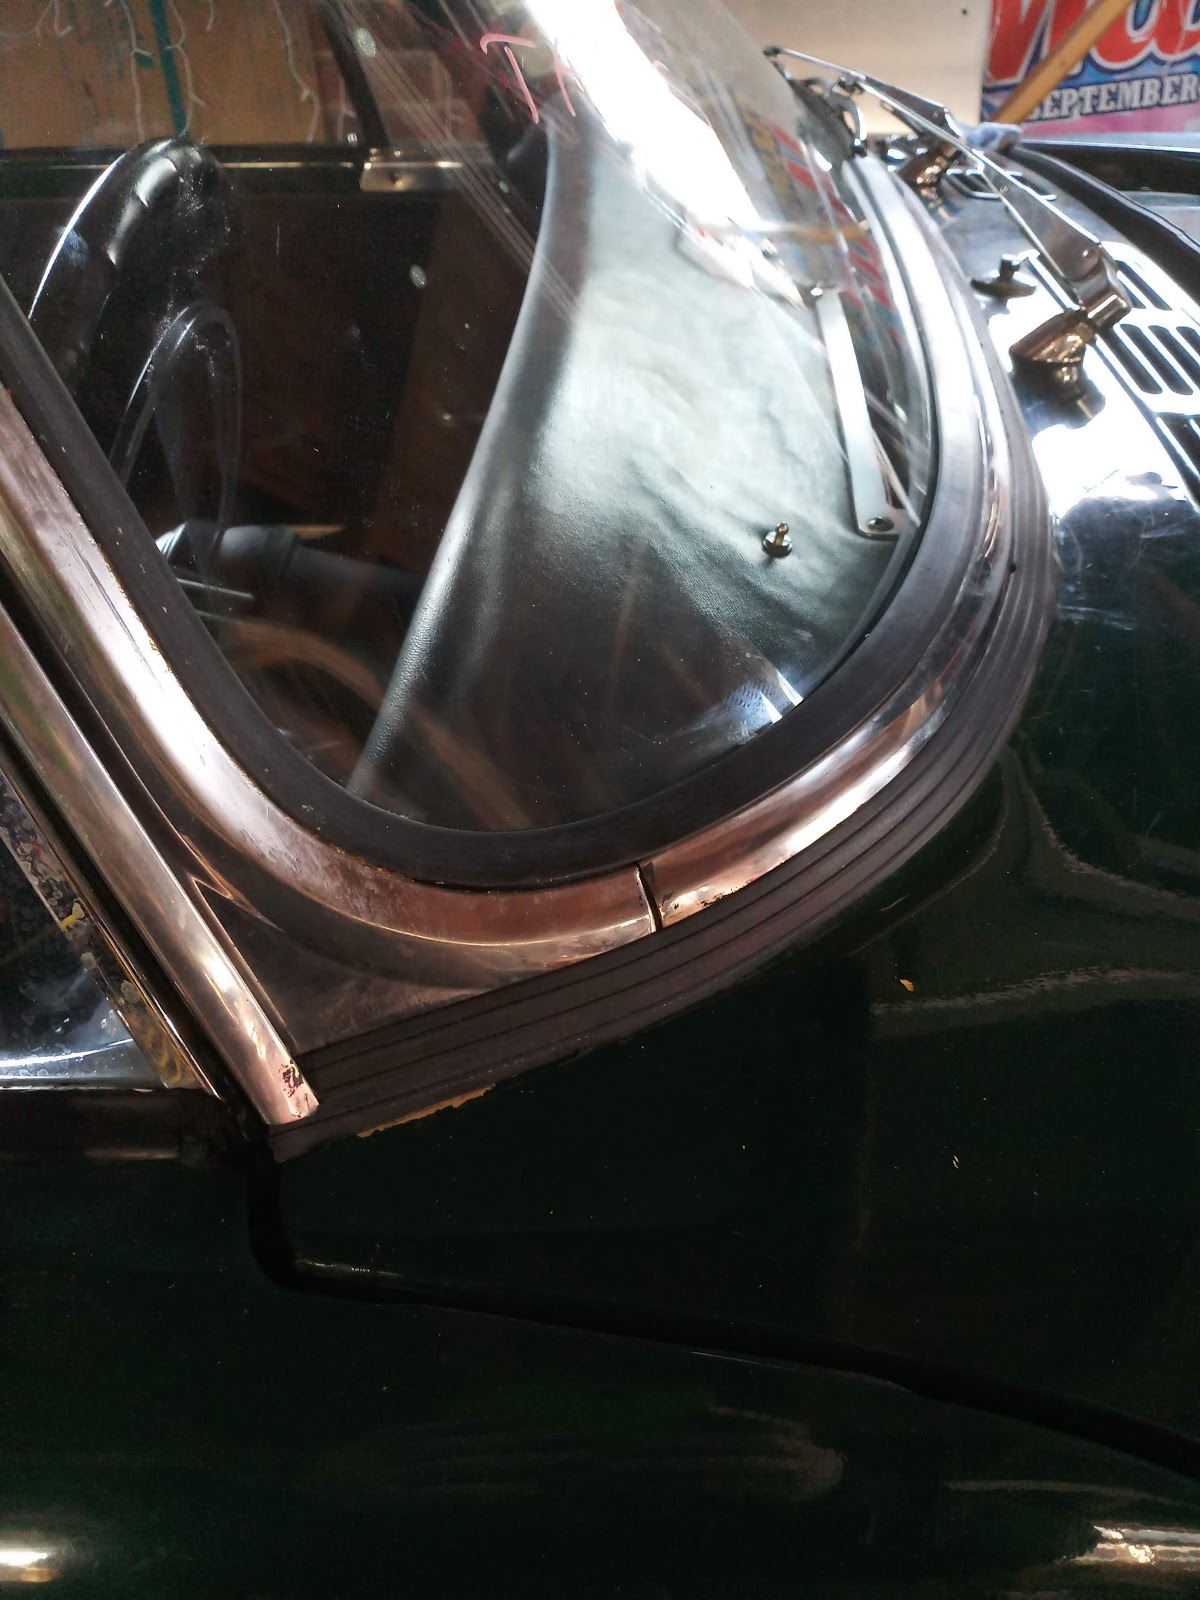
Cutting the rubber made glass removal easy. but the stainless trim wasn't so easy to remove as it was attached with a strong sealant.


Once the screen was removed the expected rust wasn't as bad as it could have been.


Not the prettiest of repairs but the stainless covers will hide it all.
Any colour so long as it's black...

I don't have the matching paint (Dupli-Color 629686 AC 7-0680) 
and she won't stay Racing Green forever so the bits that are seen will be satin black for now.

I've also left the top-rail front the original light green metallic for future reference.


Fitting the screen wasn't so bad
and the top and side trims were easy. The lower trim was fitted after the frame to body seal had been glued down.

The frame to body rubber trim wasn't so easy.
The rubber trim came with advise to glue the trim to the frame at the back where the cylindrical section is. This worked well.


The original seal had been attached by a sealant filling the entire channel section.Which I also tried to do but the sealant I used wasn't very sticky to rubber.
I followed it up with "serious glue" which did the trick and helped when fitting the frame to body.

Adjustment of the angle wasn't easy and needed some packing on one side.


LED lights


The painted orange indicator bulbs didnt look quite right in the clear lenses so I tried the orange LED indicators from classic car LEDS instead.

I needed to change the lamp holders - as the side lights are in the headlamp now and the lamp holders are offset pin dual filament. -

I've since found the supplier does a white side light and an orange flasher in LED - so I'll be changing it back soon!

The indicators are the same brightness and colour. The only obvious difference is the LEDS are instant ON/OFF compared to a more fade ON/OFF with incandescent lamps.


Hazard style

To get the indicators to work one needs to change the flasher. The type needed has to have an output for the single warning lamp. The only mod needed was to attach the required earth lead.


Then the Hazard warning (Lucas SFB300)  lamps were doing strange things so that relay also needed changing.


I got the bug - so I also changed the side light bulbs to Hi bright LED's and the stop tail lights. The side light lamp is very bright white compared to the original dull yellow.

Number plate lamp to follow soon.

Number plate lamp fitted OK - just ensure its the right way around else it wont work.

I have changed the side lights and indicators now so the lower side/indicators are used as original using an offset pin dual side(white)/indicator(amber) LED.
The lamps are peculiar in that when side lights are on and indicators are selected the associated side light turns off until the indicator is cancelled.


Saturday, 4 August 2018

Le Mans Classic and MOT time

The run to Le Mans Classic was another good test.

Prior to the run some preparation was carried out
Exhaust rattles were fixed.
The gearbox needed a lot of oil.
As did the diff.
Hand brake adjustment.

One side seems to be smoking on overrun and on the outward bound trip I lost some a fair amount of oil - but on the return no loss..!

Performance was good but 20mpg may be a bit low.

The only snag - speedo stopped working.


After the run it was MOT time. Passed.

MOT is still required  due to the engine change.
But as there is some likely sill welding needed soon its a good thing to check.

And confirm the brakes are ok.


Tuesday, 27 February 2018

Long test run


The first decent run in lovely sunbeam was successful. 500 miles in a weekend - a trip to the seaside and back.


Jobs to do

  1. exhaust rattles
  2. radio console
  3. steering stability at 75plus (check the joints)
  4. vibration at 40mph (might be 1)
  5. axle leaks
  6. diff leaks
  7. engine minor oil leak
  8. welding at rear spring hanger
  9. welding at front crossmember
  10. Speedo calibration

Sunday, 11 February 2018

Propshaft

The original propshaft from the BW35 auto was modified by changing the output sleeve yoke to a type 9 version.

It was considered at the same time to lengthen the propshaft by 1" - but the company I used ( autoprop-uk ) had recently had some items lost in a fire and couldn't do the balancing. So we just changed then ends and spiders.

I decided to wait a while to determine if all was well before going to adjust the propshaft length.


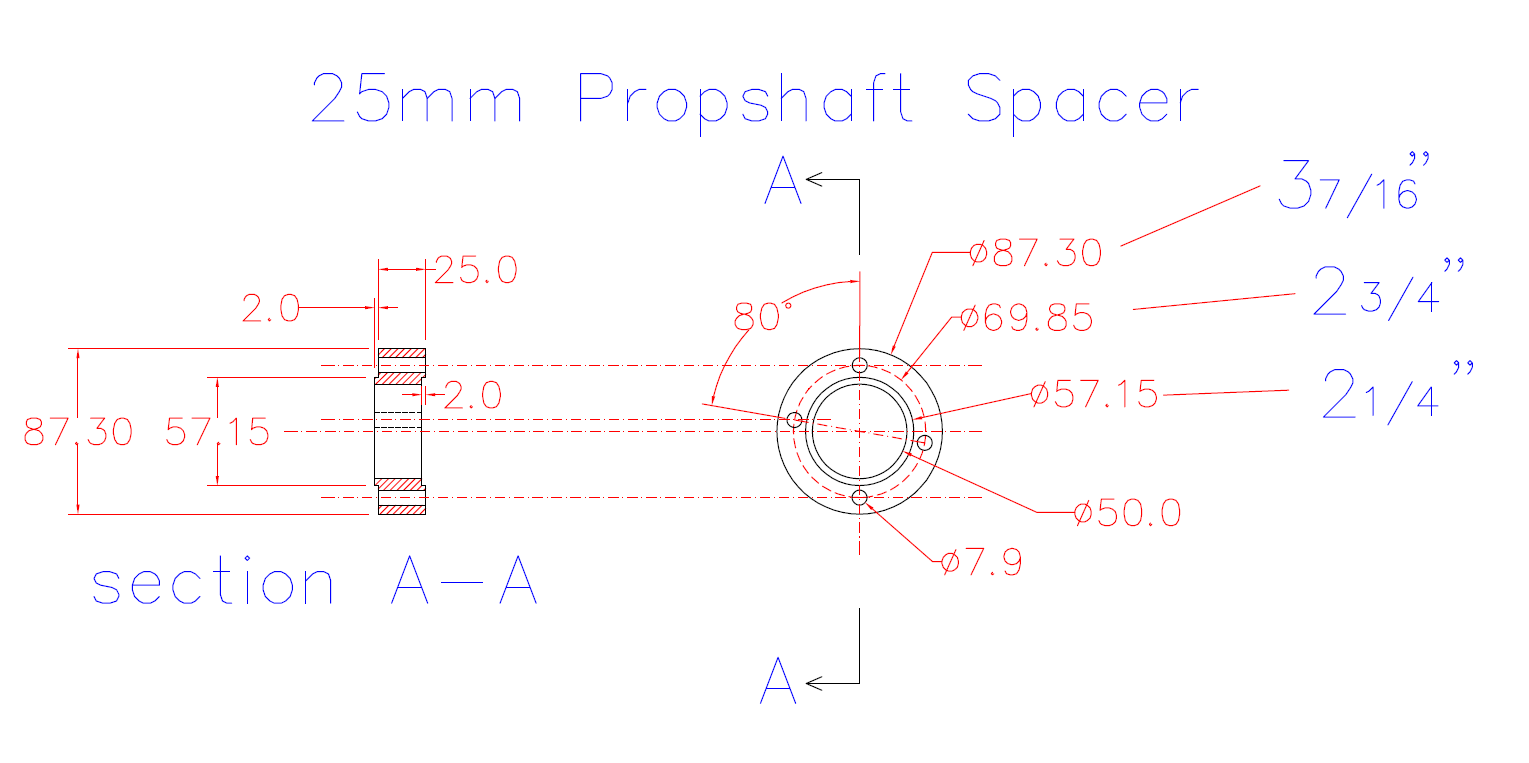
It later occurred to me that a spacer on the axle would be a solution. I wasn't sure if it would be "safe" until I noted a few "propshaft spacers" for land rovers and Atlas axles available on eBay.


So here is the drawing for the Sunbeam.

Lofty volunteered to make it.


A week later and here it is - and it fits! (amazed my measurements were accurate but lofty made compensations for my lack of tolerances )
Perfect fit on the propshaft, slight interference fit on the Diff flange as I made the measurements the same for both sides. M8x50 class 8.8 were used as the 5/16" x 1-3/4" UNF grade S were just a little too short to fully fit the nylocs.
A test run proved it hasn't added any balance issues and I'm happier the propshaft fits further onto the gearbox.

Speedometer calibration

In March 2017 A Speedo cable was purchased for type-9 gearbox to Jaeger clock from Speedy cables .

The speedo is naturally out of calibration due to the gearbox change.
Speed in mph is roughly half indicated speed in kph.


Several options are available to adjust this.

  1. speedy cables can calibrate the existing speedo. from £80
  2. www.speedograph-richfield.com can also calibrate the speedo but they also make mini gearboxes. from £90 
  3. make my own gearbox with ratio 3/4. 


I feel keeping the instrument original is a good idea, so..
I started with option 3 and made a cumbersome belt driven gearbox, connecting the input and output to the cables was the tricky part.
Then noticed that the speedo graph also do a type 9 right angle drive changer but also incorporate ratio changes. So this would help fix two issues at once as the speedo cable aims directly at the exhaust pipe.
The original speedo cable will also fit the new gadget.


I've contacted  speedograph for details to ensure the ratio is correct.
Its possible the standard RGB1030-08A 1:1.33 NR ¾ x 26 / 3mm Square  will be just right  but nice to get it spot on.

Speedograph need the tyre size and number of turns per 6 wheel revs.
I measured the speedo cable rotation at the office car park as it has a gentle slope to aid pushing the 6 turns of the driven wheel. I measured 8-1/8 turns.
With tyre size 185/55/R15 this should have a radius of 72.3" and 877 revs per mile.

some Alpine speedos types
S/N 6117/01 - ??? - 1000 revs per mile
S/N 6117/02 - Up to B9105974 - 980 revs per mile
S/N 6117/11 - From B9105975 up to Series 3 - 1000 revs per mile
S/N 5324/18 - Series 3 o/d  - 1408 revs per mile 
S/N 5324/23 - Series 4

Anyway - it seems I need a 1:1.19 ratio mini gearbox


After a short wait I fitted the new box today - its not quite right as They recomended 1:1.19 and I thought I needed 1:1.33 - I think I was closer. Maybe my speedo isnt standard 😒

Oil leak is making a mess!

It turns out my speedo had already been modified for the Automatic box. 
So Speedograph Richfield modified my speedo and it is now reading correctly and doesn't need the gearbox. The speedo is indicating a few mph lower than the GPS which is probably a good thing 😁


The speedo failed on the way to Le Mans 😞 - turns out it was the cable that broke.


Tuesday, 9 January 2018

Petrol Tank Refurb (POR 15)

The boot would smell a little of petrol when the tanks were more than half full.
Not sure where the leak was coming from but probably time to change all the rubber seals and seal the tanks with POR 15.

To remove the tanks you need to remove the boot springs and disconnect the strut from the boot lid to make space.


The condition of the tanks were not that bad but evidence of previous repair was noted on the LH outside.


Little bit rusty inside RH tank

The POR 15 cleaning takes a while. And preparing the 3 joining pipes also.


S3 filler, joiner, S4 joiner
Note that the series 3 has a different RH tank and the filler cap and joining hose is different to series 4 & 5.


The Tank sealer does need to be mixed well, it can be lumpy.
Sealing the tanks is easy enough but ensuring the excess is well drained takes some care.


Refitting the springs is easy if the strut is removed from the boot lid.

Pulling the strut rear-wards means the spring is close to the shortest extension possible. The left spring was easily fitted by hand. The right spring was a bit stronger and just needed a small hook to pull a few extra mm.


8mm Nylon fuel pipe from ssldiesel was installed as fuel feed and also a new return to tank.


Disc Brake Caliper Refurb

The car would pull to the left on hard braking.
So its time to investigate the calipers.
new piston and seals

I thought I would find old rusty calipers and rusty stuck pistons.

But it turns out the previous owner had fitted stainless steel pistons and pins.

But behind the rubber seals there was still much rust and maybe the pistons were sticky.

The calipers were dismantled and dipped in the rust dissolving solution.

After reassembly and painting in silver brake caliper paint I was advised by the forum that its
possible for the brake pads to stick in the caliper due to being the wrong size.

It was found that two pads were a tight fit in one of the calipers. These pads were 0.2mm wider than the others. They were all filed down so they loosely fit in the caliper. So now there should be no problem in the future.

Installing the rubber seals is a tricky task, but the best method was to fit the seal around the base of the piston, offer it up to the caliper, hook the lip in the groove and push in the piston to finish.

New bleed nipples and then the system was bled until air free.
Actually - not air free.. many times tried but still spongy.

A vacuum pump system was tried and also didn't fix the spongyness. Only using a willing helper to press the pedal and apply force while bleeding fix the spongyness in a few presses.

Wednesday, 3 January 2018

New Rocker covers


Ordered these rocker covers some time ago from Redmond Metalcasting.

They arrived for Christmas.


Some installers have had issues with the alternator being in the way.
Being pre-warned I didn't have an issue.
Maybe a lucky choice in fanbelt sizes.
Not a big problem  - but the breather hose needs to be extended
To keep the the run fairly neat the original hose was cut to keep the moulded bends but means a few extra unsightly jubilee clips are added.

Will look to improve that later.


Work to-do

  • Fuel return hose install
  • Fuel tank refurb
  • Oil cooler take off port blanking.
  • Front caliper rebuild
  • Engine Electrical wiring improvements