Lovely sunbeam

Lovely Sunbeam (and Annierose) 88-99-PF
Friday, 17 October 2025


Tuesday, 14 October 2025
MGF seat conversion and seat heaters
 I found some nice looking leather seats from an MGF. The green looked like it would suit the Alpine.
I would then follow the process documented in this "seat convertion video" by Oily Puddles on the Sunbeam Alpine YouTube channel
In the meantime I thought it might be good to add seat heaters - just in case.

I had some issues mainly with the front plastic clip (as warned
in the video) in fact I managed to crack it quite badly.
The lip appears to just push over the edge of the seat base but there are several barbs punched out of the steel edge to stop the cover clip from coming away.
Seat back


Seat Base


to secure the front with some screws or similar.


Sunday, 1 December 2024
Aluminium radiator
New aluminium radiator purchased after springing a big leak on the lower hose joint.
Now its been used for the year it is working very well, in fact it would seem to be so efficient the temperature is a bit lower than normal when at speed.
In traffic the temp builds up, to then be controlled easily by the fans.
So it was a worthwhile purchase that I should have done some time ago.


Saturday, 4 November 2023
GPS speedo
.PNG)
It worked rather well I thought. If a bit steppy.
Gps speed is updated every second - which can be a long time.
Although it matches exactly with google maps speed on the phone.
Miles on the trip meter is calculated every iteration (about 1 second) by the simple method of
distance = speed X time - rather than the haversine method.
In just over a 1000miles it's only 7 miles less than the daily driver so is quite good I think.
I'm now working with a Nano ESP32 version, the idea is to use its dual cores and realtime elements to have one core doing the gps and the other doing everything else and consequently able to smooth the step resonse of the needle by using the non blocking update method.and an element of prediction using acceleration.
I should be changing the brake hoses - but its cold outside.

The ESP32 is a 3.3v system and I need 5V to drive the stepper motor.
Initially had lots of issues with noise until I replced the 8way voltage converter to a 4way version.
Faster GPS module as well (same 1s update but faster to talk to)
Now I have a smooth pointer drive. Non blocking update every 50ms in its own task.
Also saves the lat long (and other data) to SD card so can view on google maps.
Lower display shows the mileage at low speeds and speed in MPH when moving. can be set to KM/h by switch.


used this as an excuse to buy a 3d printer. its definiteley and expensive speedo.
Will add a pushbutton on a stalk (similar to the original) to reset the trip and change to display to kmph.
- Lights on reminder.
- indicators on too long reminder
- day/night brightness
Can take 30s to get the minimun number of satelites after a long time powered off.
Pointer tuning at low speed still required.
.JPG)
Also needed to install an end stop more subtle than a cocktail stick.
A sewing needle was just the job.
Made a plug for the back of the speedo.
Original plan was to fit the Arduino inside the speedo but for ease of "continuous update" I'll mount it in a box.
trip reset switch (mini pushbutton) comes out of the original trip reset hole.
.JPG)
its still working on trial in the daily driver.
Now Ive updated the circuit from breadboard to veroboard.
And created a black box. There is space for more parts.
I need to add wiring for the digital inputs for Ignition and lighting (green bits in photo)
and analogue input wires from fuel guage and water guage.
I dont need the indicator input anymore, the new LED's are like laser beams.

Mileage now set to old speedo value.
The GPS sensor seems to be able to still pickup 12 satelites under the dashboard in the garage so maybe I dont need to put the sensor on the dash top.
Added the analog wires(x) for the water temp and Fuel qty and digital wires for Ignition-on and lights-on.
Water temp not really needed but might as well - roughly worked out that the temp(y) is fairly linear so y=mx+c =-.1157x + 142.7.
but that isnt quite right as currently it says the garage is 28 degrees. so it may be almost linear on the guage display range only
When I top up the tank can then work out the graph for Fuel as well. then can monitor the mpg

a 1 minute video - power on (via extra switch for now), lights on (dim display a bit) and reset trip distance

Sunday, 18 June 2023
Servo failure
It seems my servo is holding on the brakes.
Overheating so much I rolled into park foche Laon with only a hand brake.After a bit of cooling it was fine for the rest of the day.
Sticking on again at the farmhouse and unlocked when I turned off the engine.
I removed the vacuum hose and blocked it with a tyre valve.
Similar to previous post.. do I need a servo.
Well, with current braking power, yes I do. Quite a struggle to stop.
I have a girling 7/8" master cylinder. Do the none servo cars use a bigger bore?
I'll try the air valve fix first from the archive.
But also, is there a repair kit for the lockheed type 6, 4257 729 29?

Considering I always thought the brakes were a bit hard - so assumed the servo was dud anyway - now it is dud a proper emergency stop would probably break the seats by pushing so hard. So - in my case - need to fix it.
Of course there may be more wrong than just the servo.
My master cylinder is 7/8" - series I & II had 11/16". So I think to run without servo one ought to use a different master.
This weekend I'll clean and polish the air valve and give it a test run vacuum on.
And a fluid bleed.
.JPG)
So for now I've ordered enough to service what can be accessed easily from northwestclassic.
The proper full service/seal change will be done in the winter.
my servo part number is 4257-729, apparently superseded by 4257-792.
Weather is a bit
 so pulled it all apart.

The servo seals looked OK but the master cylinder seals looked life expired.
Also, despite recent bleeding of a pint of fluid, the fluid in the master still looked contaminated.
Will see soon enough. (I had some yellow that needs using up. No-one will notice)

Drove out of the garage and the symptoms were the same. - Brakes stayed on and would release with engine off or very low idle.
After some more looking at the drawings and how it works - In desperation (the only thing still- old) rotated the rubber hose that joins the front portion to the airvalve. It then seemed to work well enough to go to Capel car show.
I replaced the rubber hose with new and now it is working as expected - for two good runs at least.
maybe that was it.
So wasn't blocked but leaking. So not enough power to push the air valve back down. (Could be wrong theory)
Rotating it assisted the seal.
The pipe was easy to remove. The new one was a bit of a struggle to fit. So is well and trult sealed.
It's still OK.

But I realise now the brake effectiveness is a bit sh t. Even with the servo.
Looking at EBC front and rear next. or Princess 4 pots.
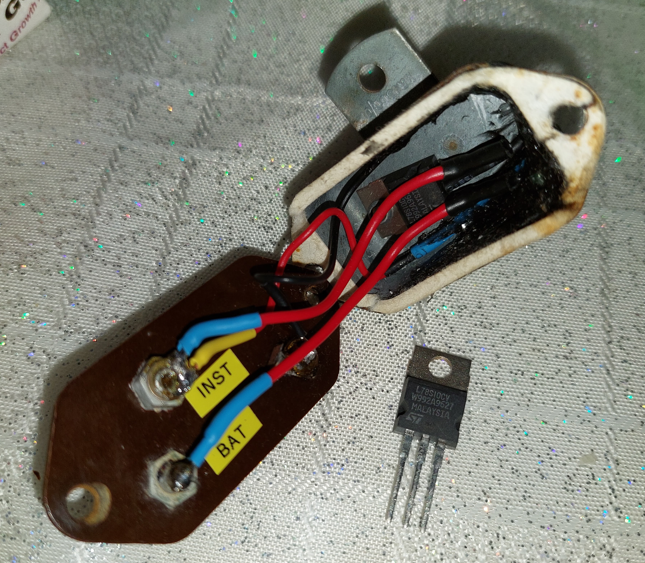
10 volt regulator
I've had the new regulator in the box since 2016.
The old regulator was working OK. but after some issues trying to measure the voltage I decided the time had come to install.For curiosity I attached the scope to see the differences.
The old bimetallic system works by switching 12V on and off resulting in an average of 10V.
Fuel gauge shows 4 gallons.
The new one works by magic and outputs 9.9V constantly
Fuel gauge shows 3.5 gallons.
When it stops raining it will be interesting to see the indicated temperature and then measure the water temp by another means.
.JPG)